Create a separate community, prepare access and branding, and check the entry before inviting members.
Before you start
You need workspace administration to create the portal and manage its access settings. Engagement must be available in the workspace. A colleague who operates the community also needs an explicit whole-portal or group administration grant.
Choose the access path for the task:
| Task | Sign-in and access needed |
|---|---|
| Configure the portal | A Zentrik workspace Owner or Admin account. Customer single sign-on (SSO) is not required. |
| Administer the community | A Zentrik account in this workspace and an explicit whole-portal or group grant. Customer SSO is not required. |
| Participate as a member, including when you also use Zentrik | A personal invitation and participation consent. Active members of this Zentrik workspace can choose Sign in with Zentrik; other participants use the configured customer sign-in. |
Sign in with Zentrik is available to active human members of this workspace for administration and participation, without customer single sign-on (SSO). Each role still needs its own access. If Customer SSO is the only enabled customer method, other participants need that JWT SSO integration to be ready before they can sign in.
Create the portal and prepare sign-in
- Open Settings → Portal → Engagement and choose Create engagement portal.
- Select the new configuration and open Access. Save its customer prefix and enabled state. Check the resulting portal URL before sharing it.
- Under Allowed sign-in methods, choose how customers authenticate. Active workspace members can also use the built-in Sign in with Zentrik option. For an SSO-only community, enable Customer SSO, turn off Email and password and Google, and configure Product SSO using the displayed callback URL, remote login and logout URLs, and shared secret. Keep the secret private. If another customer method remains enabled, customer SSO is optional for those participants. Disabling a customer method ends sessions created with it; Zentrik workspace sign-in remains available.
- Set Stay signed in for (days) as appropriate for the community.
- Turn on Community access when the program is ready. Use the page-header Save for changes in Access.
Keep Show Ideas in this portal off if the community does not need requests and voting. If you enable Ideas, select its product scope as well. A community with Ideas hidden does not require a product selection just to operate Engagement.
Prepare administration and the member welcome
- Use Administrators to grant yourself and the responsible colleagues the required scope. Workspace administration alone is not a portal grant.
- Use Groups to show the Panels that will be available in this portal. Prepare group membership separately.
- Select Open portal administration. In Branding, review the name, logo and appearance customers will see.
- Open Community settings. Review the welcome message and participation wording, the optional booking link, and whether members may start shared-home discussions. Save your changes.
- Open Emails to review the managed sender and digest settings. Email is optional and publishing content sends nothing automatically.
Groups and administrator grants save immediately in the app. Access settings use Save. Community settings and Branding live in portal administration, so check the owning screen before looking for a setting.
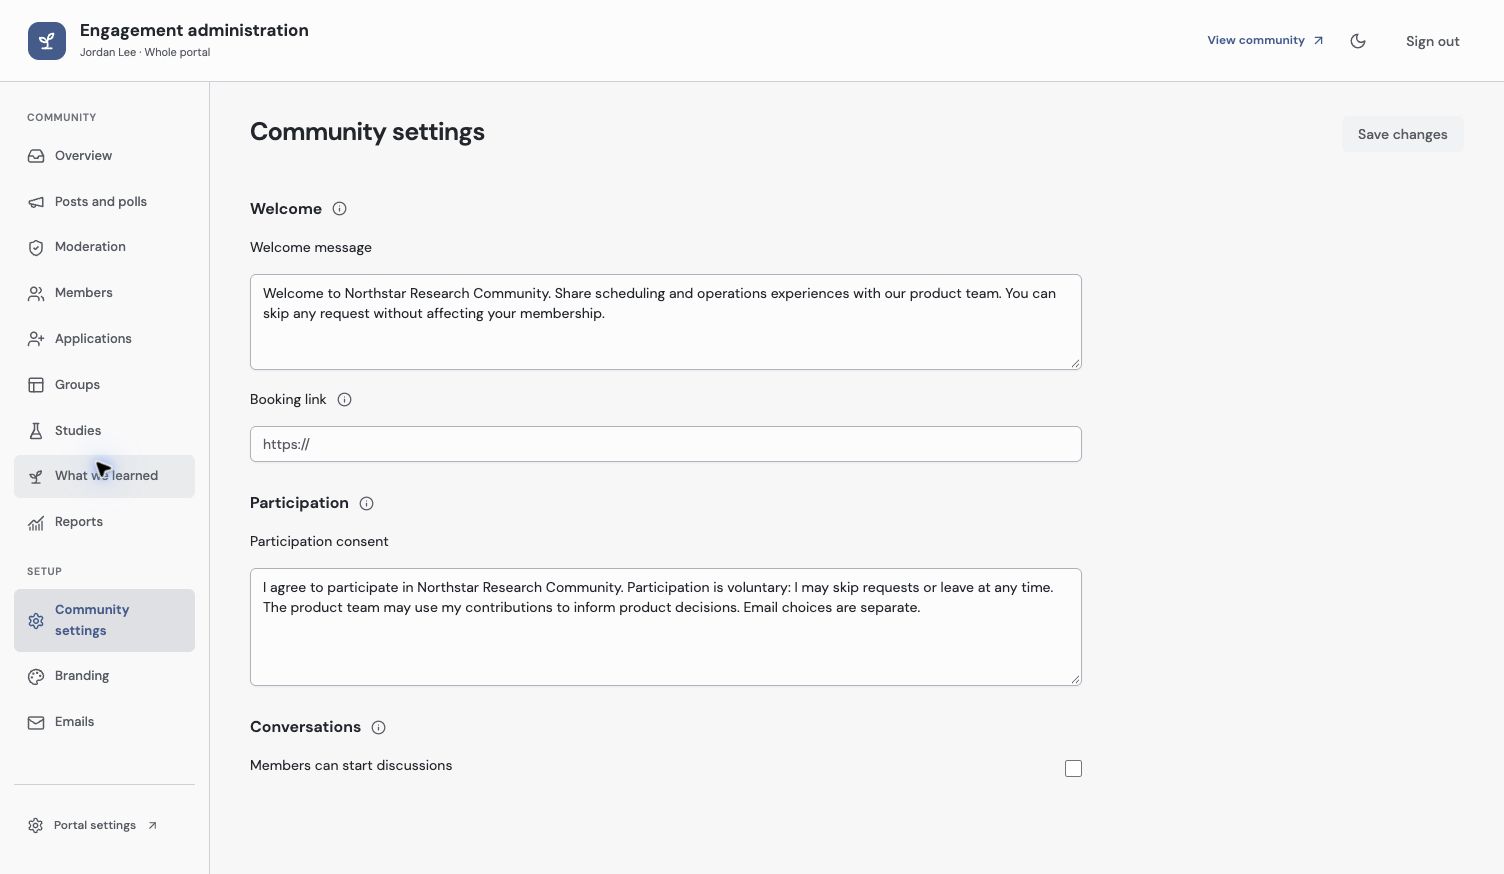
Prepare the welcome and participation wording in portal administration. These settings are separate from sign-in and staff grants.
Check the first member experience
Open the community in a separate participant session. Check its branded sign-in page, then follow one personal invitation through the configured sign-in, consent and email choices. Confirm that the member sees only their groups and can open a shared Study.
To test with your own Zentrik account, invite your own Person record using your Zentrik email. Open that personal invitation, choose Sign in with Zentrik, review consent and accept as a participant. You can do this without customer SSO, including in a community configured for customer SSO only.
View community opens a member session for your own Zentrik identity. It does not enroll you, accept an invitation or impersonate another person. If you have not joined, the member side still says An invitation is needed. Keep the member and administration URLs distinct when sharing instructions.
Next, invite your first members.
Troubleshooting
Administration asks for a grant
Open the selected portal’s Administrators tab and add an explicit grant. Also check that the portal and Community access are enabled.
The community asks me to sign in again
Staff and member sessions are separate. Active workspace members can choose Sign in with Zentrik on the member page; other participants use a configured customer method. Use the invited identity and complete consent before expecting private access.
Engagement is missing
Check the current workspace and ask its administrator whether Engagement is available. Enabling an Ideas Portal does not create a separate Engagement configuration.
Continue from here
Related guides
Did this guide answer your question?
Your response helps us prioritize missing or unclear documentation.
Still stuck?
Send your question to Zentrik support. This guide will be included automatically.